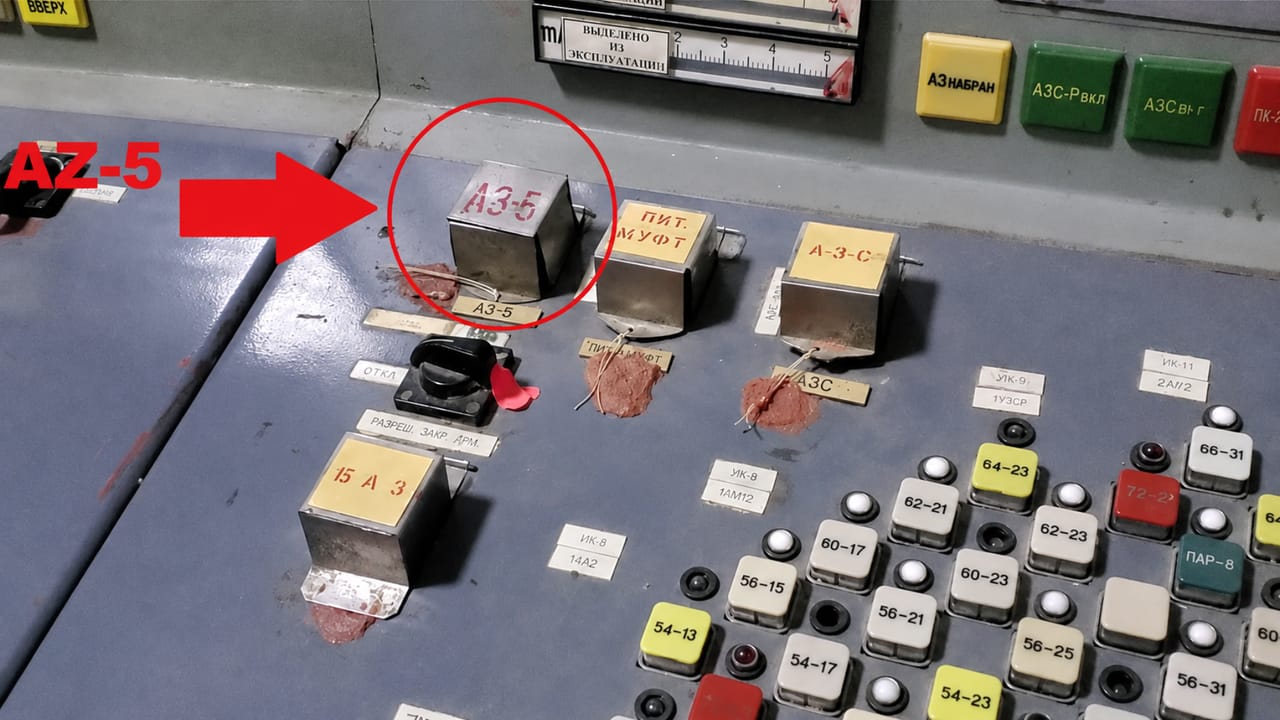
Understand why AZ-5 did not prevent the loss of Reactor 4, how the RBMK control rods worked, the role of graphite displacers, ORM, positive void feedback, and design vulnerabilities.
Check it out!
AZ-5 did not prevent the loss of Reactor 4 because the command was activated on a system that had already consumed important margins and because the physical shutdown mechanism had a design vulnerability. Under certain configurations, the initial movement of the rods could produce a local effect opposite to the one expected before the absorber section became dominant.
This does not make the button the sole cause of the accident. The critical condition was formed by low ORM, unfavorable spatial distribution, xenon influence, a positive void coefficient, hydraulic changes during the test, and design and governance failures.
There is also an important documentary uncertainty: some analyses admit that power growth may already have been developing through steam-related feedback before the command; others assign the positive rod-insertion effect the role of decisive trigger. The technically safe conclusion is that rod insertion worsened an already vulnerable condition and contributed centrally to the severity of the transient.
According to the INSAG-7 chronology, the test began at 01:23:04, the EPS-5/AZ-5 signal was recorded at 01:23:40, and excursion signals appeared at 01:23:43. A few seconds later, the records were already indicating measurement failures, pressure rise, and interruption of rod movement.
This article separates three elements that are frequently confused: the AZ-5 command, the mechanism formed by the rods and their actuators, and the physical response of the core. The distinction is essential to understand why pressing the correct button did not guarantee the expected safety result.
What Was AZ-5 at Chernobyl?
AZ-5, also associated with the reactor emergency-protection system, was the rapid-shutdown command. When activated, it was intended to order insertion of the control and protection rods into the RBMK core.
The expected function was conceptually simple: insert neutron-absorbing material into the core, reduce reactivity, and stop the sustained nuclear chain reaction. Even after shutdown, the reactor would continue producing decay heat, but the chain reaction should be suppressed.
Therefore, AZ-5 was not a routine operating command. It was a safety barrier. A system of this type needs to work predictably precisely when the reactor is in an abnormal condition.
The problem was that, in Reactor 4’s RBMK, rod geometry and the operating condition of the core allowed the first effect of insertion not to be fully reactivity-reducing.
From a systems-engineering perspective, the command was not the complete function. Between pressing the button and effectively reducing reactivity there was a chain composed of protection logic, electrical supply, actuators, couplings, mechanical movement, initial rod position, and the neutron response of the core.
An indication that a command had been issued therefore did not prove that the safety function had produced the expected result. It was necessary to correlate the order, actuator status, actual movement, position reached, and process behavior.
Digital Supervision and Control Systems
Critical functions need to show operators the complete chain from command and permissives to physical actuation and process response, preventing a simple actuation signal from being confused with fulfillment of the function.
How Should a Control Rod Work?
In a nuclear reactor, power depends on neutron behavior. When a uranium-235 nucleus undergoes fission, it releases heat and new neutrons. These neutrons can cause additional fissions, sustaining the chain reaction.
A control rod is designed to interfere with this process. It contains neutron-absorbing material such as boron or boron carbide. By absorbing neutrons, it reduces the number of particles available to cause new fissions.
In simple terms:
- more available neutrons tend to increase or sustain the reaction;
- fewer available neutrons tend to reduce the reaction;
- inserted control rods absorb neutrons and reduce reactivity;
- withdrawn rods leave more neutrons available and increase available reactivity.
That is the basic logic. But the RBMK had an important peculiarity: its control rods were not simply continuous absorber rods.
What Was Different About RBMK Control Rods?
The RBMK core was a large graphite matrix crossed by vertical channels. Some channels contained nuclear fuel and cooling water. Others contained control and protection rods. Others were used for instrumentation.
The control rods occupied their own channels, separate from the fuel channels. They moved vertically through electromechanical mechanisms of the reactor control and protection system.
The critical point is that RBMK rods had an absorber section and also graphite displacers. These displacers were not the reaction-braking material. The reactivity-reducing function came from the absorber section. Graphite served a different design purpose.
This characteristic is one of the keys to understanding why AZ-5, instead of immediately reducing reactivity under every core condition, could contribute to an initial localized increase in reactivity.
Why Was There Graphite in a Control Rod?
The question is legitimate: if a control rod is meant to reduce the reaction, why put graphite in it?
The answer lies in the RBMK design compromise. Graphite was not placed there to “accelerate before braking.” It was used as a displacer, occupying part of the channel when the absorber rod was withdrawn.
Why? Because when an absorber rod was withdrawn, the control channel was not neutronically identical to the rest of the core. It could contain water. And water, in addition to participating in cooling, absorbed some neutrons.
In the RBMK, graphite was the main moderator. Its function was to slow fast neutrons, increasing the probability of new fissions in uranium-235. Water played another role: it removed heat and also absorbed some neutrons.
Therefore, from a neutron-efficiency perspective, a control channel filled with water when the rod was withdrawn acted as parasitic absorption. The graphite displacer reduced this effect, making the channel more similar to the rest of the graphite moderator matrix.
In normal operation, this solution made sense for reactor performance. Less parasitic absorption meant better use of neutrons generated by fission, greater neutron efficiency, and more favorable operation within the design logic.
But a solution that is good for operational efficiency can be unacceptable if it compromises a safety function under limiting conditions.
Why Not Make the Entire Rod from Boron?
This is one of the most important questions for understanding the design problem.
If the rod’s function is to absorb neutrons, why was it not entirely absorbing? Why not replace water with boron or boron carbide, ensuring that any insertion immediately reduced reactivity?
From a safety perspective, the question makes complete sense. An emergency rod should reduce reactivity from the first movement.
But within the RBMK design logic, a rod with excessive absorption over its entire length would impose a different tradeoff. It would maintain very high neutron absorption under conditions in which the reactor was supposed to operate at power. That would require compensation in core design, fuel enrichment, fixed absorbers, power distribution, and control strategy.
The graphite displacer was a design choice to preserve neutron efficiency when the rod was not supposed to act as the primary brake. This choice reduced neutron-absorption losses during normal operation but created dangerous transient behavior during insertion under certain conditions.
Here is the engineering lesson: performance optimizations cannot degrade the safety function. If safety depends on a rapid-shutdown command, that command cannot have an ambiguous first effect under any reasonably foreseeable operating scenario.
The decision should have been assessed using a state matrix: rated power, low power, different axial distributions, reduced ORM, extreme rod positions, and hydraulic disturbances. A solution acceptable at the nominal point may become incompatible with the protection function when independent variables converge on a limiting condition.
Owner’s Engineering
Independent review of assumptions, interfaces, and degraded scenarios helps identify design decisions that improve nominal performance but compromise critical barriers under exceptional conditions.
Why Is “Accelerate Before Braking” a Good Analogy?
The expression “accelerate before braking” does not describe the designers’ intention, but it describes well the effect that could occur in Reactor 4.
When many rods were highly withdrawn and AZ-5 was activated, the first insertion movement placed graphite displacers in regions where there was water in the channels. Because water absorbed neutrons and graphite moderated them, this replacement could locally increase reactivity before the absorber part of the rod entered a truly effective region of the core.
Under a normal condition, this effect could have been small or compensated by the rest of the system. But Reactor 4 was not in a normal condition. The core was already at low power, under strong xenon influence, with many rods withdrawn, ORM far below the minimum, abnormal power distribution, and increasing steam formation.
Therefore, the initial effect of the graphite displacer ceased to be a design detail and became a decisive factor in the final accident sequence.
What Was ORM and Why Did It Worsen AZ-5?
ORM means Operational Reactivity Margin. It was not simply the physical number of rods in the core. It was a calculated control margin expressed as the equivalent number of fully inserted rods.
In the RBMK, ORM was fundamental because it indicated how much effective control capability still existed in the core. The lower the ORM, the smaller the control reserve and the greater the reactor’s vulnerability to disturbances.
According to INSAG-7, at rated power and under stable conditions, ORM should have been in the range of 26 to 30 equivalent rods. If it fell to 15, the reactor should have been shut down immediately. Before the final accident sequence, later calculations indicated ORM far below this limit, with values on the order of 6 to 8 equivalent rods depending on the reconstruction used.
This meant that many rods had been withdrawn to recover power after the drop to about 30 MWt. The reactor was left with little effective neutron-absorption reserve and with a configuration especially dangerous for AZ-5 activation.
INSAG-7 emphasizes that the safety significance of ORM was poorly understood. It was seen mainly as a margin for controlling power distribution, but its impact on the positive void coefficient and on the effectiveness of emergency shutdown was much more serious.
The Positive Void Coefficient Was Also Part of the Chain
AZ-5 did not act on a stable core. It was activated after the turbine test had already changed the hydraulic dynamics of the system.
During the test, closure of the turbine steam valves initiated deceleration of the turbine-generator set. This affected the pumps associated with the test, altered flows, and contributed to steam formation in the reactor channels.
In the RBMK, more steam meant less liquid water absorbing neutrons. Because graphite continued moderating the neutrons, reactivity could increase. This is the positive void coefficient.
Therefore, when AZ-5 was activated, the core was already subject to dangerous feedback: more steam increased reactivity, more reactivity increased power, more power generated more heat and more steam.
The initial rod effect, combined with reactivity associated with increased steam, was sufficient to produce a severe power transient.
What Happened Between 01:23:04 and 01:23:49?
The chronology must be read carefully because the available systems did not record every variable at the same interval. DREG had good resolution for hundreds of signals but did not directly record power, reactivity, flow per channel, or the position of all 211 rods. Other calculations had cycles of approximately five minutes and experienced interruptions.
- 01:23:04: closure of the stop valves of turbogenerator 8 and formal start of the rundown test.
- 01:23:40: EPS-5/AZ-5 signal recorded and start of movement of the protection and control rods.
- 01:23:43: protection signals associated with rapid power growth; records indicate power above 530 MWt.
- 01:23:47: abrupt changes in flow, pressure, and level, accompanied by signals of measurement-system failures.
- 01:23:49: signal of increased pressure in the reactor space, loss of actuator power supply, and controller failures.
The temporal proximity shows that command, neutron response, hydraulic changes, and equipment degradation evolved almost simultaneously. However, the absence of some measurements prevents each variation from being assigned to a single mechanism with absolute precision.
SCADA Systems
Historians, sequence of events, time synchronization, and correlation among electrical, mechanical, and process signals are essential to reconstruct rapid transients and distinguish command, effect, and consequence.
Did AZ-5 Cause the Accident?
Not as the sole cause.
AZ-5 was activated when the system was already in a critical condition. The chain that prepared the accident involved the drop to low power, xenon effects, rod withdrawal, reduced ORM, starting the test under unsuitable conditions, the positive void coefficient, and problematic control-rod geometry.
But it is also incorrect to say AZ-5 was irrelevant. INSAG-7 considers that the positive rod-insertion effect, combined with increased reactivity from steam formation, was decisive in the severity of the transient that destroyed the reactor.
The most accurate formulation is:
AZ-5 did not by itself create the dangerous condition, but rod design caused the emergency command to contribute to worsening a condition that was already unstable. This avoids two errors: attributing the entire sequence to the button or, at the opposite extreme, treating it as irrelevant.
A shutdown function must specify not only that rods move, but that reactivity be reduced from the beginning, within a maximum time, and under all intended operating configurations. The old design did not make this result a guarantee independent of core state.
Requirements, Evidence, and Acceptance-Criteria Management
Protection requirements need to state the expected physical result, covered states, maximum response time, and evidence required to demonstrate that the function remains effective under normal and degraded conditions.
What Did INSAG-7 Change in This Interpretation?
The initial interpretation of the accident strongly emphasized procedural violations and operator actions. INSAG-7, published later with new information and analyses, revised part of that interpretation.
The report gave much greater weight to design factors, especially:
- positive void coefficient;
- design of the control and safety rods;
- positive emergency-shutdown effect;
- low ORM and its safety significance;
- lack of suitable information for the operator;
- absence of adequate automatic protection against certain dangerous configurations;
- communication failures among designers, operators, regulators, and responsible organizations.
This point is essential: Chernobyl cannot be reduced to a story of operators pressing the wrong button. Later technical documentation shows a much more complex picture involving design, operations, safety culture, and technical governance.
Was the Positive Effect Known Before 1986?
INSAG-7 records that the phenomenon had been identified at the Ignalina plant in 1983. The design organization communicated the existence of the effect to other RBMK facilities and indicated that design changes would be made.
However, the changes were not implemented before the accident, and recommended procedural measures were not sufficiently incorporated into operating instructions. The prevailing view was that the combination of conditions required to make the effect significant was unlikely to occur.
The accident reproduced exactly that combination: many rods withdrawn, low ORM, unfavorable spatial distribution, increasing steam formation, and shutdown activation under a degraded condition. The problem, therefore, was not merely discovering a vulnerability, but failing to convert it into correction, restriction, training, and evidence of effectiveness.
A Performance Optimization Became a Safety Failure
The graphite displacer made sense within a neutron-efficiency logic. It reduced the presence of neutron-absorbing water in control channels when the rods were withdrawn. This improved neutron utilization and contributed to reactor performance.
But this optimization had a dangerous consequence: under certain conditions, the first movement of rod insertion could locally increase reactivity before reducing it.
From a safety-engineering perspective, this is the central point. An emergency function cannot depend on the system being in a favorable condition to work correctly. It needs to be robust precisely when the system is degraded.
In other words, a design decision aimed at operational efficiency cannot compromise the reliability of a safety barrier.
What Does This Teach Modern Critical Systems?
Chernobyl’s lesson extends far beyond nuclear power. In any critical system, it is necessary to assess how a solution behaves not only during normal operation but also under degraded conditions, transitions, partial failures, and operational pressure.
This applies to:
- power plants;
- substations;
- data centers;
- operation centers;
- SCADA systems;
- critical telecommunications;
- industrial automation;
- electronic-security systems;
- remotely assisted installations.
An interlock, protection logic, backup system, or emergency command cannot function only in the ideal scenario. It must work in the scenario where it is most needed: when variables are outside normal ranges, operators are under pressure, the operating sequence has changed, and margins are reduced.
Verification must cover the end-to-end chain: condition detection, command generation, auxiliary-source availability, actuator operation, travel time, position confirmation, and the effect produced on the protected variable. Testing only the button or only the final component leaves critical interfaces unverified.
Commissioning and Technical Acceptance
Integrated tests demonstrate whether a protection function produces the expected result within the required time, including under degraded states, auxiliary failures, and critical combinations of variables.
This is why practices such as commissioning, technical auditing, Owner’s Engineering, FEL, EPCM, and technical due diligence are so relevant in critical-infrastructure projects.
Modern systems also require reliable supervision, event recording, adequate instrumentation, clear procedures, and technical communication among design, operations, and management. This is the role of solutions such as SCADA in the power sector, remote assistance in substations, and disconnect-switch monitoring.
Conclusion: The Button Was Not the Isolated Problem
AZ-5 became part of history because it was activated in the final seconds before Reactor 4 was destroyed. But the problem was not only the button. It was in the system the button commanded, rod geometry, RBMK physics, low ORM, the operating condition of the core, and a safety culture that allowed known vulnerabilities to remain insufficiently corrected.
The graphite displacer was an optimization of neutron efficiency. During normal operation, it made sense as a way to reduce parasitic neutron absorption by water in the control channels. But under extreme conditions, this solution created a dangerous transient effect: before braking, the system could locally increase reactivity.
In Reactor 4, this characteristic encountered exactly the scenario in which it could become decisive: low power, xenon, withdrawn rods, ORM below the minimum, positive void coefficient, and the start of a test under a vulnerable condition.
The central engineering lesson is direct: a performance solution must never compromise the safety function. In critical systems, the emergency brake must brake from the very first instant.
To continue the learning journey, explore ORM and reactivity margin, o positive void coefficient, a control-rod geometry e a complete test chronology. These chapters show how accumulated conditions converged in the final seconds.
Technical References
[1] INTERNATIONAL ATOMIC ENERGY AGENCY. The Chernobyl Accident: Updating of INSAG-1. Safety Series No. 75-INSAG-7. Vienna: IAEA, 1992.
[2] SHTEYNBERG, N. A. et al. Causes and circumstances of the accident at Unit 4 of the Chernobyl Nuclear Power Plant. In: INTERNATIONAL ATOMIC ENERGY AGENCY. INSAG-7, Annex I. Vienna: IAEA, 1992.
[3] ABAGYAN, A. A. et al. Causes and circumstances of the accident and measures to improve the safety of plants with RBMK reactors. In: INTERNATIONAL ATOMIC ENERGY AGENCY. INSAG-7, Annex II. Vienna: IAEA, 1992.
[4] UNITED STATES NUCLEAR REGULATORY COMMISSION. Report on the Accident at the Chernobyl Nuclear Power Station. NUREG-1250. Washington, DC: NRC, 1987.
[5] UNITED STATES NUCLEAR REGULATORY COMMISSION. Implications of the Accident at Chernobyl for Safety Regulation. NUREG-1251. Washington, DC: NRC, 1987.
[6] INTERNATIONAL NUCLEAR SAFETY ADVISORY GROUP. Safety Culture. INSAG-4. Vienna: IAEA, 1991.
[7] INTERNATIONAL ATOMIC ENERGY AGENCY. RBMK Reactors. Technical description and safety characteristics of pressure-tube graphite-moderated reactors.
[8] CHERNOBYL NUCLEAR POWER PLANT. Sequence of events at Unit 4 on 25–26 April 1986. Technical chronology compiled from operating and instrumentation records.
[9] MUELLNER, Nikolaus. Three Decades after Chernobyl: Technical and Institutional Lessons. Vienna: University of Natural Resources and Life Sciences.
[10] WORLD NUCLEAR ASSOCIATION. RBMK Reactors and Chernobyl. Technical overview and subsequent safety modifications.
Frequently Asked Questions
AZ-5 was the command for the RBMK emergency shutdown system. When activated, it ordered movement of the control and protection rods to reduce reactivity.
Because the command acted on an already vulnerable core and on rods whose geometry could produce an adverse initial effect under certain configurations.
Não. O comando ocorreu no final de uma cadeia formada por baixa ORM, xenônio, distribuição de potência desfavorável, positive void coefficient e falhas de projeto e governança.
AZ-5 was the command. The rods, their actuators, and the core formed the physical mechanism responsible for executing the shutdown.
INSAG-7 records the emergency-shutdown system signal at 01:23:40 on April 26, 1986.
There is uncertainty about the exact onset. Analyses recognize the influence of increased steam and consider that the positive rod effect decisively worsened the transient.
Low ORM indicated little effective control margin and a configuration less tolerant of disturbances and the initial rod effect.
Rod design, ORM limits, insertion speed, protections, instrumentation, and RBMK operating restrictions were modified.
Additional Technical Materials
Solutions
- SCADA Systems
- Digital Supervision and Control Systems
- Requirements, Evidence, and Acceptance-Criteria Management
Engineering Services
- Owner’s Engineering
- Technical Auditing
- Commissioning and Technical Acceptance
- Telecommunications Design
Chernobyl Learning Journey